Remote Desktop Connection isn’t as safe as you think, and the chances of malware entering your device and stealing your data are quite high. This is the only reason Windows flashes a warning message ‘Make sure you trust this PC; connecting to an untrusted computer might harm your PC’ while you try to connect to a PC.
Secure Remote Desktop with Remote Credential Guard in Windows 10
So, if you are a regular Remote Desktop Connection user, it’s best to secure your remote desktop connection with Credential Guard. Here’s how to secure a remote desktop with the remote credential guard in Windows.
Restricting delegation of credentials to remote servers
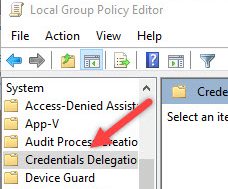
Search for the “gpedit.msc” on Windows search and hit the Enter button. This will open the Group Policy Editor; navigate to the location Computer Configuration > Administrative Templates > System > Credentials Delegation.
Find the policy “Restrict delegation of credentials to remote servers” and double click on it. This will launch another window, you have to select ‘Enabled’ and click on the Apply button.
After that, select another option, “Require Remote Credential Guard” from the drop-down menu and then click on the OK button which will save up all the settings done. Just restart your system, and the Remote Credential Guard would be enabled.
Using Registry Settings
Press “Win + R” and then type in the command “regedit“. Once done, hit the Enter button.
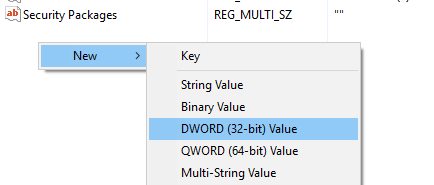
This will open the Windows Registry editor window, navigate to the location “HKEY_LOCAL_MACHINESystemCurrentContro“. Right-click on the panel from there and select the option “New > DWORD“.
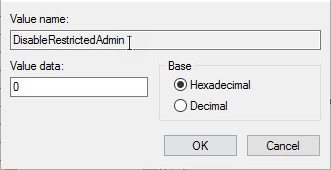
Rename this value to DisableRestrictedAdmin and then double-click on this value to open up the edit value menu. Make sure that value data is set to 0, and restart your system after that for the changes to appear.
Using Cmd
You can also use the Command prompt to enable the Remote Credential Guard, type in the command /remoteGuard, and hit the enter button.
These are the few easy methods to secure a remote desktop with the remote credential guard in Windows 10. If you need more help on this topic, let us know in the comments below. Also, if the article helped you, share it with your friends as well.


